Showing posts with label Potting shed. Show all posts

Saturday, October 18, 2014

NZ Song Thrush

Peter found a nest with a clutch of little blue eggs in a nest in our potting shed. We knew they were Song Thrushes by the type of nest, the little blue eggs with the distinctive spots at the broader end of the shell.


Song thrushes are territorial and nest as solitary, monogamous pairs, breeding from August to February, peaking in September – November in most localities. They nest in the forks of shrubs or trees several metres above the ground and usually well concealed by foliage. The nest is a tightly woven bowl of grass, small twigs, lichen, wool, dead leaves and lightly lined with mud.  Two, three or more clutches of 3-4 (sometimes 5-6) eggs may be laid during a season especially if an earlier clutch is lost. The eggs are light blue-green or pale blue with tiny dark spots at the larger end. Incubation is mostly by the female and takes 12-13 days. Young are blind and naked when hatched and open their eyes after 5-6 days. They are well-feathered 12 days after hatching, and fledge at 12-14 days. Both sexes share feeding, including of fledglings.
- extract from NZ Birds Online

You can hear their lovely song here.

So we decided to take little clips every couple of days of their progress. This is day 1 (after all the eggs had hatched)...


We were amazed at how fast they grew. By day 3 or 4 their feather quills were quite developed and their body tone was strong...


By day 6 or 7 they still had their eyes closed, but had got used to keeping their mouths open for feeding...


By day 9 or 10 they were used to opening their mouths to be fed every time you ventured close to them...


and by day 14 they we know that they had already ventured out of the nest as we found it empty in the morning and full again in the evening...


Soon they will have flown the nest, growing up to look like this...

Saturday, March 15, 2014

Potting Shed Progress...


Peter and my grandfather have been building the potting shed by themselves out of recycled materials, and they have almost finished. It looks amazing. They started off by building the base on tow-able skids. Then they built the framing for the walls...


The erected framing...

and then built the trusses in situ...

before putting on the galvanized roof ready for painting...

Next they put up the wooden cladding over the framing...

The rest of the cladding and the windows were put in this week... 

 More evidence of the drought. The large standard rose in front of the shed will bounce back we hope...

Soon it will be painted a lovely pale cream to match the Lutyens benches, with the door being painted a French Provence blue. We will complete it with ornate wrought iron ornamental Gothic hinges on the door.

The buxus is hanging on in there through the drought ready to be planted in the front entrance this winter, and also in the garden beds in front of the house and colonnade.

Meanwhile the Hibiscus seems to be thriving in the heat. This beautiful purple species is H. coelestrus. We are going to propagate another 6 plants from it this winter.

Update: Cyclone Lusi should put and end to the drought for now. I just hope it leaves the potting shed still standing!

Sunday, October 13, 2013

Potting Shed for the Potager...

Despite Peter being very busy with keeping an eye on the construction of the manor house, the new piglets, ducklings and the spring gardening at WBP, I have drafted up plans for a Potting Shed for the Potager for him to build with my grandfather, Noel. Noel did such an amazing job on the pig sty, I know he and Peter will be able to knock up a lovely country potting shed in no time...


I found this photo of a potting shed online, and it is very close to my dream potting shed. I love the steep pitched roof, with the angular, almost gothic door and the mini cupola atop. Our potting shed has been designed to be less than 10 square metres, and portable if required, in order than it meets the county council's building regulations (any larger and a building consent is required). Thus I have come up with the following plans...

Above: Birds eye view of external plan. There is a small gravel rectangle in middle of potager with the 9.88 square metre potting shed at its centre. There are urns/pots on either side of door and on the corners, with a climbing Zephirine Drouhin rose on back wall. There are four cold frames abutting the potting shed on either side.

Below: Internal plan showing benches on 3 sides. Above each bench is a window made up of about 16 small panes of glass. The lids of the cold frames will be made from the same recycled windows used for the shed.


Some inspiring potting sheds...
Above: Windows similar to the ones chosen for our shed.

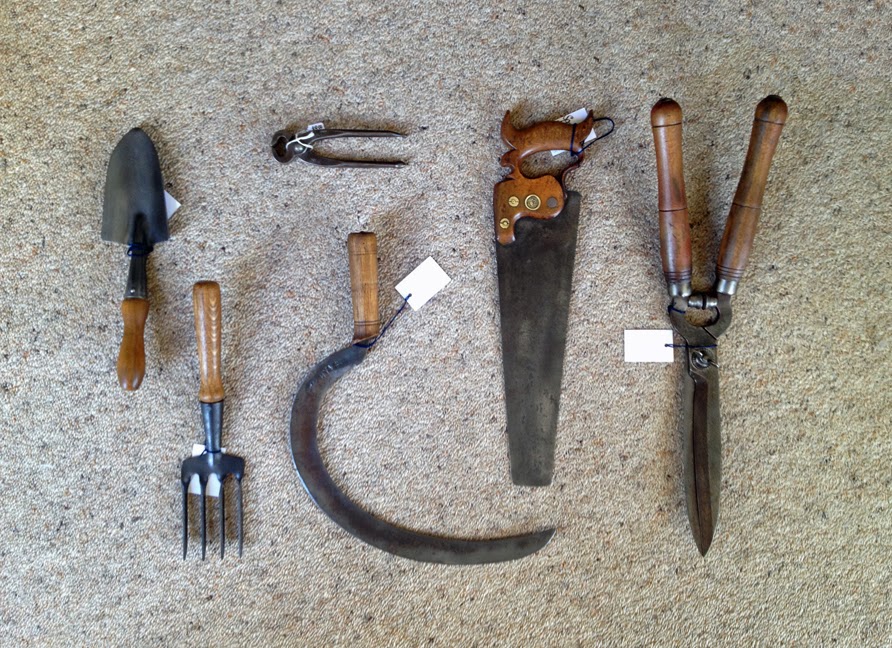
When I was back in NZ a couple of weeks ago, I flew to Christchurch with Peter and our Godson, who Peter showed around the South Island whilst I was catching up with my mother. We spent a day driving around closed down antique shops (5 of the 6 shops who still advertise as being open after the earthquake were, in fact, closed down). The one which was however open had an amazing range of reconditioned vintage gardening tools. My mum bought me a collection of tools as a belated birthday / early Christmas present. I plan to display them inside the potting shed...

A potting shed looks great with lots of pots and old tools...
It needs a tub as well in which to wash out the pots and water the newly sown seeds and seedlings

It will be painted a pale cream colour on the outside, to match the Dovecote, and the Lutyens Benches, which were originally going to be painted that duck egg blue colour that is popular in provincial French gardens.

Along each side of the potting shed will be cold frames made from old salvaged windows..


Once it is completed it will be a lovely space to potter about in.

Wednesday, July 13, 2011

Potager Progress Part One...


I thought in this post I would show some photos of the progress, albeit slow, that We have made over the last 18 months in trying to turn a bare piece of weed-strewn field into a traditional potager garden.

When we started the field was dense with buttercup and wild grasses, running up to a neighbouring tennis court which had badly rotten netting and a rotten ashfelt surface...


Above: A view along the back border of the potager when it was just a paddock, as it was being marked out and measured.

Below: The same view today. Our neighbours have put in a smart new tennis court with new ashfelt and very spiffing black netting. The Fejoa hedge has gone from 6" tall to almost 3' tall and bushed out quite a bit. It shall form a silvery backdrop to the purple and blue border. Forgive the rainy, muddy winter view - I look forward to sharing the blooming, colourful summer view in Potager Progress Part Two, in a few months. You can see some of the roses waiting to be planted when it dries out a bit, and also more polythene matting waiting to be covered with limestone chip.


Before we made any of the beds, the first thing we did was plant the boundary with a dense Hornbeam hedge. You can see the hedge below, seemingly running down the middle of a paddock.

Above: The Hornbeam hedge 1 year after planting, and newly re-mulched.

Below: The same hedge 6 months later, with new growth and newly created garden beds.


This is probably a good time to introduce our garden angel, emanuensis extraordinaire and general factotem, Jackie (below). Jackie has helped so much with the gardening at Willowbrook. She is currently recovering from a broken hand - get well soon!


Then we constructed the raised beds and carefully placed them in situ according to our plan (at very top of the post).

Above: The newly created potager beds put in place

Below: The same beds filled with soil and some temporary planting. You can also see the temporary runner duck coop, no longer required now they have a good sense of 'home'. The space in the middle where all the timber is, is where we are going to build the potting shed (another job to get around to!).


Below: The Polythene paths being laid down, over which the lime chip shall be leveled. At this stage there was still a lot of grass around. We have since sprayed that off. We shall re-sow the feature lawns with a good compact lawn seed, rather than the wild grass.


Above: A view of one of the newly placed pots in a bed

Once the border has been planted this spring, and the ground work is completed, we shall continue embellishing with further architectural features, the first one being blue painted obelisks...

Obelisks...


Obelisks are a fairly traditional, geometric feature, and are a part of so many garden designs.


They can really make a statement, as in these last two photos, and I hope we can achieve this in our little garden.


It has been slow progress, but we have done all the work ourselves in our 'spare time', which does give one a sense of pride! Stay tuned for our next post when we will bring you part nine of "The Great Country Estates of Britain Series".
Related Posts Plugin for WordPress, Blogger...