


Choosing the right architrave for our doors was an interesting task: because the selection was so vast and the effect on the look and depth of the doorway was extremely varied with different choices.
There were a couple of firm decisions that had to be made. The first was should the architrave run all the way to the floor, or should it stop on top of the skirting boards or terminate on little square blocks? We decided after looking at many photos of interior magazines that it really should run all the way to the ground. Terminating on corner squares (designed to alleviate the problem of joining different depths of skirting to architrave) looked 'bitsy' and was not the look we wanted.

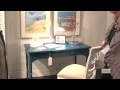
Above: Architrave terminating on a square.
Below: Architrave running right to the floor.

Terminating on top of the skirting also made the meeting of the two profiles awkward, so to the floor it was. Then we had to decide how the architrave profile was to blend with that of the skirting. We solved this problem by placing the thicker side of the architrave on the outside of the doorway and the thinner on the inside. This meant that there was a solid depth of 32mm all the way around the outside of the doorway into which the skirting could abut. We then chose to take the maximum thickness of the skirting up to 32mm so that where they joined would be seamless.
Having decided on these set parameters there were a myriad of configurations and profiles to choose from, but in the end we did not choose any of the existing profiles, but deigned both the door and window architraves, and the skirting boards ourselves...

Above left: Our skirting board profile
Above right: Our architrave profile
We designed a nice high skirting board that was going to be in proportion to the height of the rooms (many modern houses have 8 foot studs and very low skirting. We have 12 foot studs and wanted to make a feature of our skirting (or base boards as they are sometimes known). Below is a photo of a marble skirting board which inspired part of the profile design for our wooden boards:

We liked the flat middle section for the skirting, because we wish to recess the power-points into the board so that they are not so obvious (power not being the most Georgian of concepts).
The door and window architraves were originally designed to be of two different sizes (same profile, but scaled larger for the door ways) but when we had some test runs made, the door architraves seemed too wide (they were as wide as the skirting was high, which made the combination seem boxy). So we decided to use the window width throughout which, being thinner than the skirting, looked more elegant.

Above: Example of an architrave the same width as the skirting is high.
Below: Example of an architrave which is thinner than the skirting is high.

The profile of the architrave was also designed so that certain bands of the profile could be painted off-white or maybe gold, to highlight the framing and give the doorway a more dramatic appearance. Below are some examples of how gold highlighting in an architrave might transform the look of a doorway...


Here are some more architraves we looked at...


One can add a more ornate overmantle atop the architrave to increase the detail of the doorway too...


Architraves all the way to the floor...


One stopping on block...

By the time I get home in September all the doors, windows and architraves should be fitted. I'll share some more photos then.


No comments:
Post a Comment