Sunday, October 21, 2012

Vineyard Part Two...


Once the ground had been cleaned and contoured, my grandfather and I laid out the posts and pegged out the rows:


We then dug 3 feet down and sunk each post in, lined them up vertically with a spirit level and packed the soil around them to hold them tight:


Before the posts could be strung with the wires they had to be stayed so that they wouldn't collapse inwards with the strain or lift out of the ground. There are 2 main post staying techniques, staying them from the inside:

or tying them back and guying each post to a smaller, deeper sunken post: 

Tying them back is the more secure method, as if you stay them on the inside, the stays can act as a fulcrum if there is enough strain, and the posts can still lift out of the ground. Not wanting the visual clutter of seeing the stay poking out of the ground, we buried our stays and laid them horizontally tying the wires around their girths...


This has the added advantage that the stay is much more secure as there is a larger surface of soil holding the posts back.

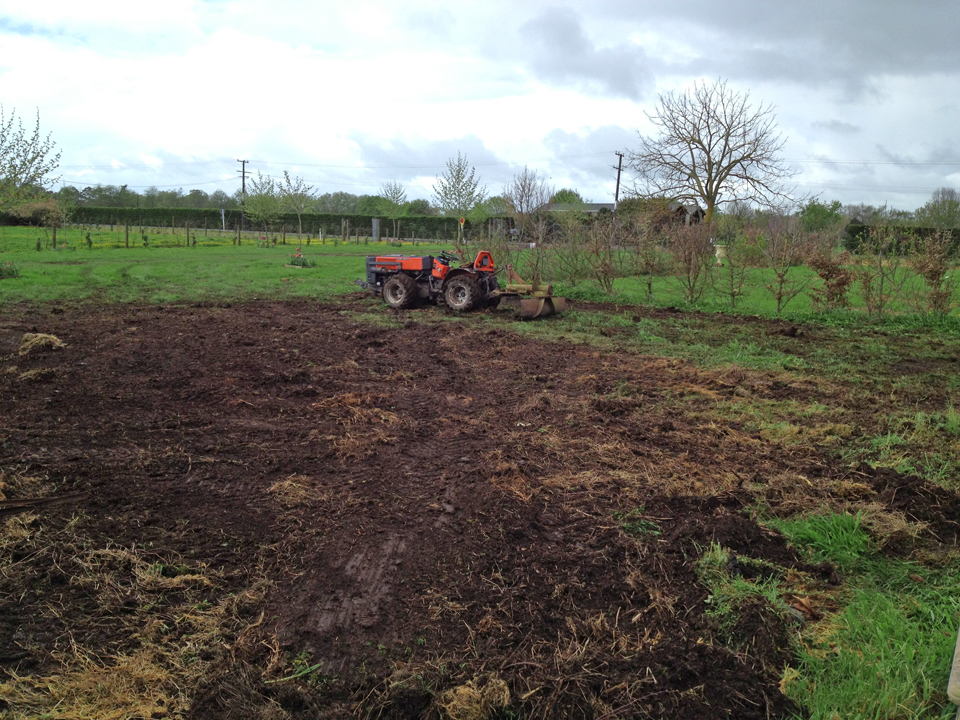
Above: All the posts stayed.

Then it was time to string the wires up. We chose 3 wires, allowing us to have 3 cordons, at 1', 2' and 3' respectively. Simple stapling of the wires usually suffices. We used wind-up wire tensioners in the middle of our wires to get them nice and taut, and added a middle pole halfway along the wire to prevent sagging.


Planting and training the vines...


Above and below: The final product, 8 rows of grapes planted, mulched and tied to the wires


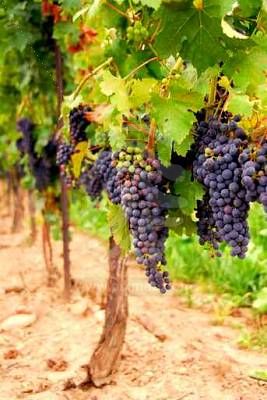
When planting a vine an espalier type technique is usually used to get maximum support for each vine as well as good airflow around the grapes and maximal sun exposure...

Proper training of grapevines is essential to maintain plant size, shape, and productivity. If left unattended, grapevines can become unruly, and fruiting will be poor due to overproduction of vegetation.

To start training your vine, plant it and let it grow almost unfettered in the first year. Then in its first autumn select the 6 best canes (a summer shoot that has matured and hardened off into a woody, brown cane) to train along the wires to become your cordons (a permanent extension of the trunk that is horizontally positioned along the trellis wireTrain one cane along each wire, growing away from the main trunk.

In the second autumn you count the buds on each of the spurs (the fresh canes coming off your cordon) and prune the spur back to about 3-5 fruiting nodes. These nodes will each produce one cluster of fruit. How many buds you choose depends on desired fruit load and space.

You may use different approaches for determining the number of fruiting buds. With any pruning system, at least 85 to 90 percent of the one-year-old wood will be removed during pruning. This will allow the grapevines to maintain their structure (shape), distribute the fruit load along the cordons, and enhance fruit quality. On three-year-old (or older) vines, approximately 40 to 50 buds will be kept.


Grapevines are best pruned in the middle of winter, when sap levels are at their lowest and the wood is fully hardened. During the spring remember to regularly mulch to retain moisture and decrease weed growth; and to fertilize with an all-round nitrogen based fertiliser.

Monday, October 15, 2012

Weather Bomb...


A nasty weather bomb descended across the north island yesterday, and upon Willowbrook. One of our 3 year old Plane trees was snapped in half and many of our new trees blown over. It was difficult driving home with the twigs and leaves and rain hitting the windows. We fared better than some parts of the island, where roofs were ripped off and windows blown in. Just a little way down our road several mature trees were uprooted or torn apart by the winds...


Despite the bad weather, our second Highland Cow decided it was time to give birth. Here are some pictures taken in the calm after the storm...


 Even the Herefords were nosey...


At least The Bluebell Walk has managed to survive to buffeting winds (so far)...


Sunday, October 14, 2012

Vineyard Part One...


Last week we started work on creating our own bijoux vineyard. We are turning the driest and most sheltered spot in the park into a 50 foot x 100 foot vineyard.

With the area we had, and a minimum space between vine rows of 6 feet, We were able to chose 8 varieties of table grape and 8 varieties of wine grape.

Table Grapes, White:
Himrod
Interlaken
Iona
Matakana Gold

Table Grapes, Red:
Black Hamburg
Muscat Hamburg
Schuyler
Robinson

Wine Gapes, White:
Viognier
Chardonnay
Muscato
Gewürztraminer

Wine Grapes, Red:
Merlot
Shiraz/Syrah
Pinot Noir
Pinot Meunier

Until the barn is shifted we can only plant half the vineyard, so we are starting with the table grape half.

Our Table Grape Varieties: 
Red grapes...

Above: Black Hamburg a medium to large juicy black grape. The oldest vine in England is said to be the Hamburg Black vine at Hampton Court planted by Capability Brown in 1768. Harvest: March to April.

Below: The Muscat Hamburg, and medium sized firm skinned black grape with a strong muscat flavour. Perfect for deserts, cheese boards and sweet wines. Harvest: March to April.

Above: Schuyler Grapes, A very sweet purple/black table grape known for its slight current flavour. It is self fertile, and keeps its red and gold leaves well into winter. Harvest: Late February to Mid March.

Below: Robinson grapes. A deep purple mid sized sweet table grape with firm skin. Reliable cropper. Harvest: March.

White Grapes...


Above: Himrod medium sized deep green seedless grape known for its honey like flavour. Harvest: February to March.

Below: Interlaken - a small pale green grape, sweet and juicy. Harvest: January.

Below: A recently rediscovered heirloom variety, Matakana Gold is a NZ variety of table grape, golden and juicy. Harvest: February to March...

Iona, a white grape with a pink blush to its skin. Known as a hardy disease resistant grape, and a heavy cropper, it has sweet pink grapes of a medium size. Harvest March - April

Some of our table grapes ready to be planted...

The preparation begins...

Above: An expanse of rubble and detritus accumulated over the last 2 years next to the barn. Next year the barn will be pulled down to make way for the driveway and for the second half of the vineyard.

After a few hours with a tractor and bucket removing the rubble and old iron; and the grader-blade, contouring the area, we are ready to foot and stay all the posts...


Join us for part two - erecting the posts and wires, planting the grapes and maintaining the vines.

Monday, October 8, 2012

Production Line...

Peter has been busy knocking out wooden squares to go around all our new trees, to hold the mulch and bulbs in. He has got it down to a fine art. We should have plenty of timber left for building the potting shed, and making borders for the Lime Walk and Bluebell Walk

We have planted up the second stretch of the driveway with a further 14 Plane Trees, and have been at work mapping out and planting up Badger's Wood. We have also started planting up all our urns and pots with fresh potting mix and spring flowers, and have started preparing a site for our boutique vineyard, which we shall share with you in our next post.


While we have been busy at that, the Dorset Horns have kept giving birth to late lambs. No more Highlands yet. They must be due by the end of this month though.


Monday, October 1, 2012

Fruit Cages, Berries, and Pies...


As Spring is bursting forth at Willowbrook we are all hands to the beds in the potager and park. This weekend we just finished weeding and mulching our berry beds. We have a berry quarter to the potager, comprising 12 raised beds each with different berries:

  • Strawberries
  • Raspberries
  • Blackberries
  • Boysenberries
  • Gooseberries
  • Cranberries
  • Worcestershire Berries
  • Red Currants
  • Black Currants
Above: The Strawberries weeded
Below: Mulched with pea straw to stop the berries coming into contact with the soil.
The thornless blackberries were rather a mess before last weekend

Now we have got the beds in order we need to design some chick cages to go over the top of them, to stop the birds getting to them first. I like the first example best, but here are a few...


Above: Berry Cage at Houghton Hall, by Ell Brown Flickr

Once we do get a decent crop it will be time to bake some pies...

Bramble Pie
Ingredients...

Pastry:
175g Flour
25g Sugar
75g Butter
1 Egg Yolk
Pinch of salt
1 TblSpn of cold Water

Filling:
2 Apples, peeled, cored and sliced
100g Brambles (Blackberries, Raspberries, or combination)
50-100g sugar (depending on fruit sweetness and personal preference)
3 Tsp Cornflour for binding

Pre heat oven to 200 degrees C (390F)
Rub butter into flour and sugar until it becomes crumbly. Add egg yolk and Tbspsn of water and mix until it forms a dough.
Knead on floured surface. Remove a portion (1/4) for decorating top.
Line a 7” pie dish. Prick bottom evenly with fork tynes.
Bake for 6 minutes to firm up pastry (otherwise you’ll end up with a soggy base)
Remove and dust lightly with cornflour, again to prevent soggy base
Add filling and sprinkle on sugar to taste
Decorate top with strips of pastry or other pastry motifs such as leaves.
Bake for 5 mins at 200 degrees, then turn down oven to 160 degrees (320F) for a further 15-20 mins until pastry is golden.
Remove, dust with icing sugar. Serve or allow to cool.

Related Posts Plugin for WordPress, Blogger...